Table of Contents
Let’s make something clear: This is not another generic advice post for marketing your products on Instagram. No, this is something much more powerful. This is a guide to using Instagram for business by maximizing the platform Instagram created specifically for that purpose.
Their analytics and ads platform.
In this guide, you’ll learn the advantages of an Instagram business account over a personal account and everything you can do to make the most of your time on Instagram. That means more traffic, more leads, and more sales.
Let’s get started.

There are a lot of major differences between a personal Instagram account and a business account. If you’re serious about marketing on Instagram, you need a business account.
For example, using Instagram business specific account gets you access to:
If you haven’t converted to a business account yet, do so now by following these directions:
Now that you’re all set up, let’s talk about your new tools.
With a business account, you get access to Instagram’s advanced analytics software.
Not only does this allow you to see the demographics of your followers and who is liking and commenting on your pictures, it also shows you which photos perform the best and result in conversions.
If you’re running an Instagram account for an online eCommerce store, for example, you can see how different product photos perform against each other.
Say you put some product photos on a white background, some out in nature or the city, or some with cute animals next to your product.

By using engagement data such as likes, comments, or clicks, you’ll be able to tell which type of product shots perform best so you know what to post more of. (Like more pictures of dogs!)
Whatever niche your business is in, Instagram analytics can help you understand what your audience wants, create better content, and ultimately drive more traffic and sales.
Before you delve too deep into the rabbit hole, let’s understand the basics: Demographics.
Knowing where your audience lives, how old they are, and when they’re most frequently engaging with your content will set up the foundation of your content strategy.
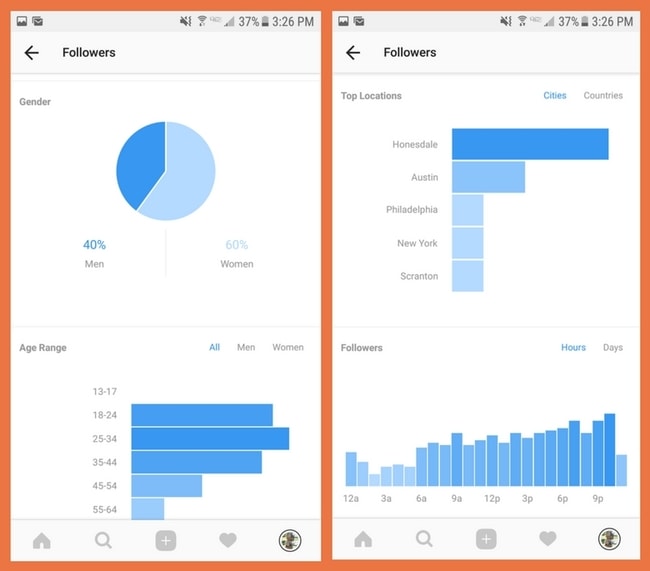
The analytics above can be found by tapping the bar graph in the top right of your Instagram page, then scrolling down to see follower demographics.
As you can see, it shows when your followers are most active, how old they are, where they live, and what gender they are – all useful information!
It looks like our followers are most active around 9 to 10 PM. That means we should be posting at least once around that time, every day.
But there are some other important metrics you should be aware of…
There are a few different terms you’ll want to familiarize yourself with if you haven’t already:
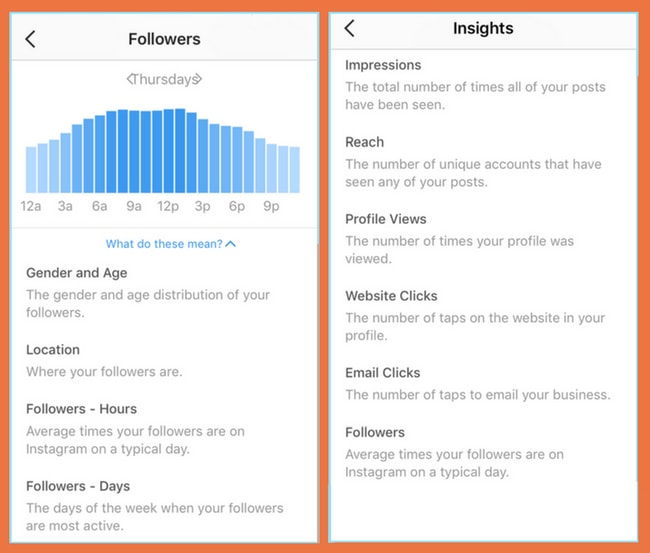
Of all these, the most important are:
Engagement is the most important of the three. It doesn’t matter how many people are seeing your posts if no one is interacting with them.
Ready to take your engagement to the next level? Book a demo with Flowbox now!
Key Takeaway: When going through your analytics, look for the posts that get the most engagement and create your new content with that in mind. Get creative! Schedule those posts to go out during your peak engagement hours. These two things are the biggest powers of Instagram analytics.
Now that you understand how to use the analytics to improve your account, it’s time to understand how to boost your best posts to achieve more clicks, leads, and sales using Instagram for business.
Released in late 2015, Instagram ads are a great way to drive targeted traffic to your eCommerce site. The advertising base now includes 2 million monthly advertisers, and it only continues to rapidly grow.
In short… this stuff works. But how do you use it?
Instagram gives you four ad type options:
While each can be used effectively, for the purposes of keeping it simple, I’ll be using photo ads in all our examples and instructions.
You can decide the purpose of your ad by choosing one of the following objectives (note that this choice is important and will affect how your money is spent and how your ad is optimized).
For maximum ROI when you’re just starting out, I would stick to consideration or conversions.
You already know based on your analytics which of your posts performs well. Now you just need to get that post in front of more people like your followers.
Luckily, Instagram’s ad platform allows you all the same in-depth targeting options as Facebook. These include targeting based on location, demographics, interests, behavior, lookalike audiences, and automated targeting (let Instagram decide).
They also offer the ability to use your Facebook custom audiences if you have them, which is awesome!
Here are the exact steps to creating your first Instagram ad:
While you can create Instagram ads from within the app itself, I prefer doing it from my computer via the Facebook Ads manager. To do that, you need to sync up your accounts.
Go to the settings tab on your Facebook page and click “Instagram Ads”.
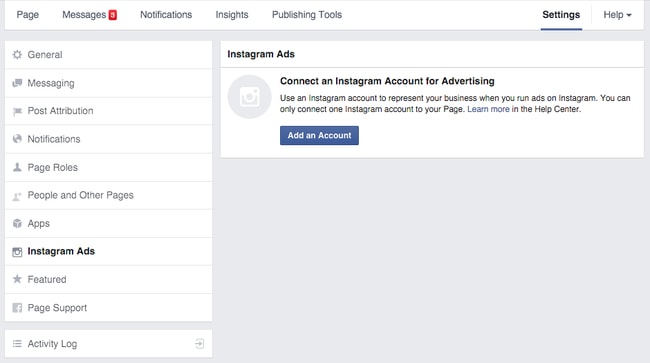
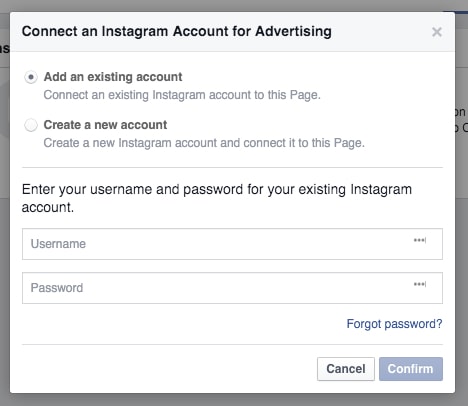
Next, click “Add an Account” and fill in your Instagram login credentials and hit “confirm”. If you don’t have an Instagram account, you can create one from this box as well.
Visit the Ads Manager to create your first campaign. In the upper left corner click “+Create Campaign”.

Next, choose your campaign objective. (Note: not all objectives are compatible with Instagram Stories Ads.)
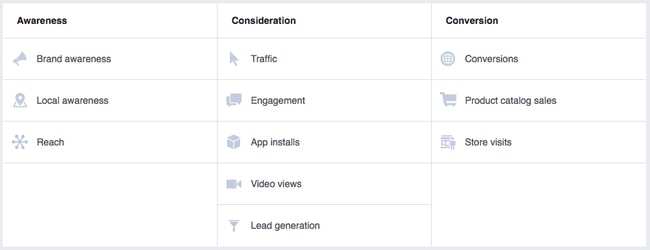
Again, you probably want to go with conversions as your objective.
(Note: In order to use this objective, you need to have a Facebook pixel installed on your website. If you don’t have it, you’ll get a message letting you know.)
Give your campaign a name and hit “continue”.
On the ad set page, choose to optimize for “purchase”.
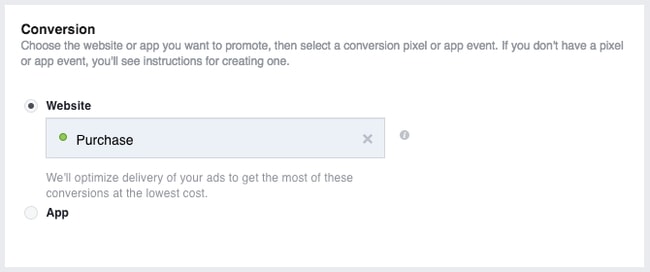
Next up it’s time to choose your ad spend and targeting options. For help deciding who to target, check out The Next Ad University’s guide.
Pro Tip: If you already have Custom Audiences, you can select them for targeting with your Instagram ad.
After that, you’ll select your ad placement.
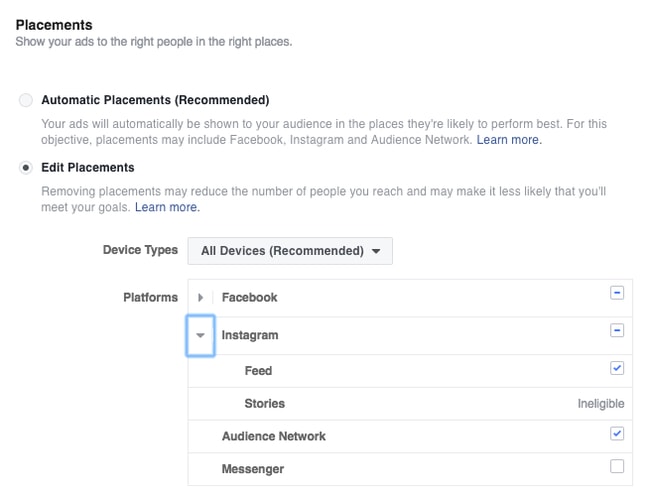
On the next page, you’ll choose your ad spend. I recommend starting low – no more than $5 per day. You can always increase the budget if the ad is performing well.
When you’re done, hit “Continue” and you’ll decide your ad type. Note that the “Carousel” format isn’t compatible with Instagram.

Finally, add your text, image, and call-to-action choices. You can preview them and see how your ad would look in each format.
Once you’re happy with the way it looks, place your order!
Once you’re done, let it run for at least three days. (It takes about three days, but as many as seven, to see the true results of an ad.)
After three days, come back to review the results. If you’re positive, or even breaking even, it’s probably a good idea to scale up your budget. I wouldn’t go any higher than $20 until you’re at least slightly positive and the ads been running at least seven days.
If the ad is negative, you can either tweak the image, the description, the offer, or the targeting, but not at the same time. If you want to test anything in your ad, it’s important to test only one variable at a time so you know exactly which change caused a change in conversions.
Otherwise, if an ad is negative, cut it entirely and try another product.
Ads are not the only way to drive traffic and increase conversions in your eCommerce store using Instangram, you can also add a link to your stories to attract more followers to your store and discover more products.
Here’s how to do it, according to Social Media Examiner:
You can take an image or video directly within the Instagram Stories app or swipe up on the Story screen to import any image taken within the last 24 hours.
You may be thinking, I thought that the only place to link is in my bio??
This is true unless you have over 10,000 followers. Then you can add links directly into your Instagram stories!
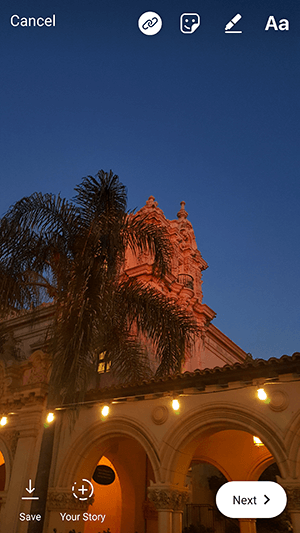
To add your link, click on the chain link icon at the top of your story.
The chain link icon appears at the top of the Story page to add a clickable URL.
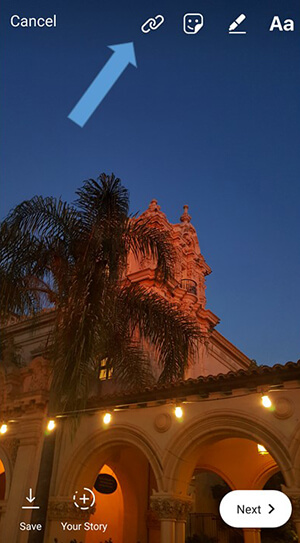
A new window will appear on your screen, allowing you to input the link destination of your choice. Type in the complete URL address and tap on the green check mark (on Android) or “Done” (on iOS) to save the link.
The URL page will allow you to type in the link for any web page to which you want to send your audience.
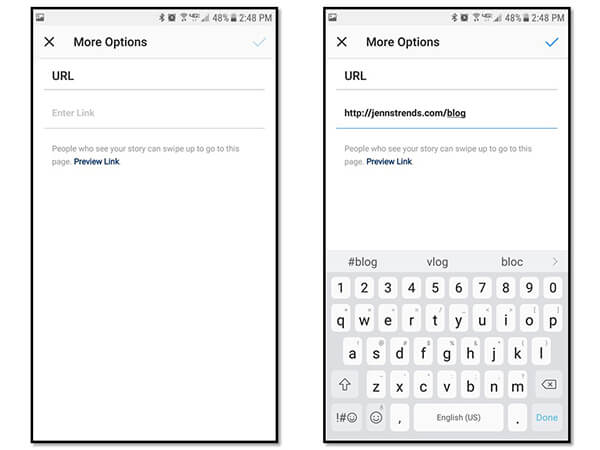
Instagram Story analytics do not currently track URL clicks, so to measure your traffic and conversions, you’ll want to use a link that you can track separately. I recommend you use a link shortener such as Bit.ly or Rebrand.ly to create a shortened URL you can track metrics with.
Once you’ve successfully linked a URL to your story, the chain link icon will appear highlighted to indicate your story has a link.
The chain link icon on the story is highlighted when a URL is successfully linked.
Add any other content including text, stickers, and filters to your story. And don’t forget the power of the Instagram story hashtag for getting your content seen! Then upload it to your profile as you would any other story.
I highly recommend you include a call to action (CTA) in your story text to direct your viewers to access the link. Common CTAs include “Swipe up to see more” or “Tap ‘See More’ to visit our website.”
When people on Instagram view one of your story posts that includes a link, they’ll see the See More option at the bottom of the screen.
Viewers will see the See More option at the bottom of a story post when a link has been added.

While the See More prompt is clearly visible, some viewers may not notice it if they aren’t looking for it. Less-frequent users of Instagram may not even know to look for it, which is why it’s prudent to include a CTA as shown in the figure above.
Using Instagram for business is one of the best ways to drive high-converting traffic to your eCommerce store. Expert product photos tend to perform really well, and you can even leverage a User Generated Content strategy so you don’t have to take your own photos.
Instagram accounts for one out of every five minutes spent on a smartphone. It’s got a LOT of user attention, and you can scoop up that attention with your ads by using Instagram for business.
Plus, by using Instagram for business, you get access to detailed analytics to understand everything about your customers, from what they like to when they browse.
If you’re not using Instagram for business yet, what are you waiting for? Get started today!
Looking for more Instagram tips? Head to our complete guide to Instagram Marketing, where you’ll find everything you need to know about promoting your products on this crucial platform.